Mounting large format tapestries

Someone emailed me a few days ago asking about hanging methods for tapestries. Apparently sometime in the past I put some information about this online somewhere, but I can't remember this for the life of me... neither can I find it on the internet. To be honest, my memory is a bit like a colander. Things just fall out of it all the time and I have to hope that they show up again at some point. I thought it was a great question and a couple years from now when someone asks me where I posted about mounting tapestries, I can search my blog and say, HEY! See? Things show up again, colander or not.

I know that "large format" is a bit of a contentious term these days if you read the ATA-talk listserv, but I want to make clear that this hanging method works best for larger works rather than works you might sew to a frame covered with fabric or perhaps put into a frame to display. What constitutes "large" and "small" is entirely up to the artist! I want no part of that particular discussion. The world needs both small and large things and it is all relative anyway.

The largest of my tapestries at the moment are over 4 feet wide (what that is in meters I don't know and I feel rather ashamed for not being able to converse in metric. After all, it does seem the better system), but I hang many narrower tapestries this way also.

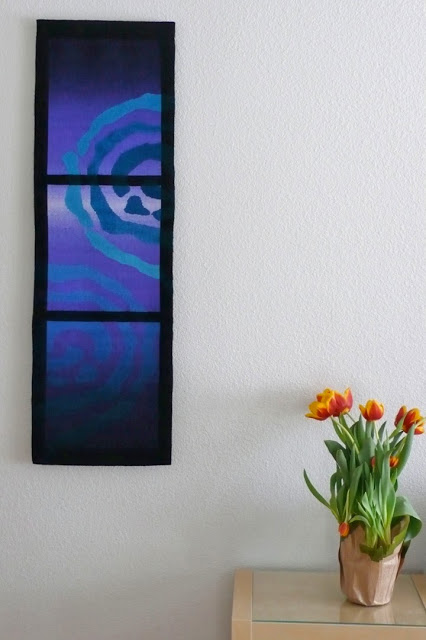
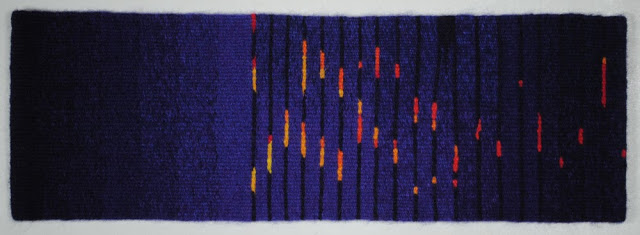
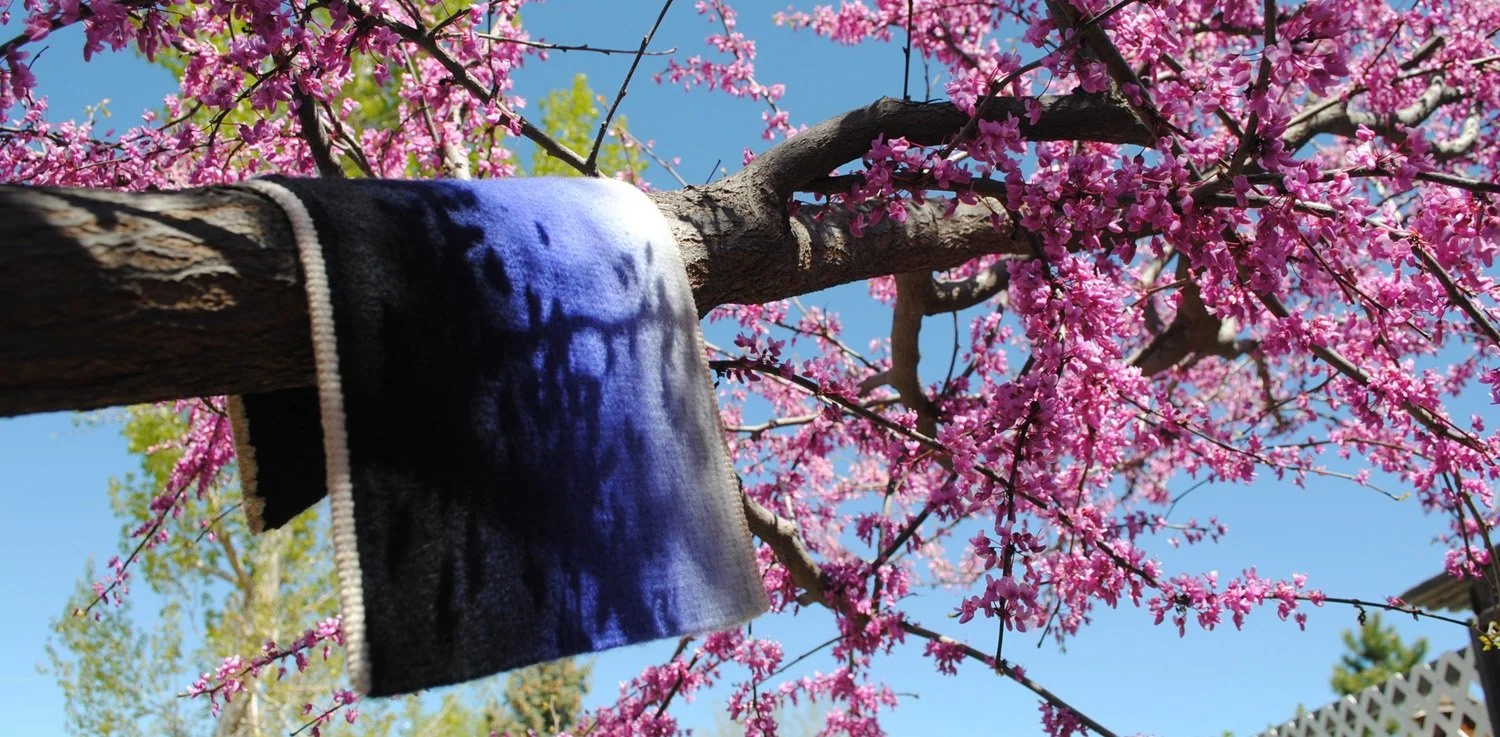
Here is a snapshot of Emergence VI hanging in the client's home. It was mounted in the way I am going to describe below.
Rebecca Mezoff, Emergence VI, 16 x 49 inches, hand-dyed wool tapestry
When weaving the tapestry, I follow these steps:
1. Put in waste yarn (same weft I use for the piece) until the warps are evenly spaced and you have enough to hold the whole thing together when you take it off and as you are doing the finishing work.
2. Do a line of twining with the warp yarn.
3. Weave three sequences of warp used as weft.
4. Weave three sequences of weft in the color of your piece. This part will get folded under in the hem.
5. Do a row of soumak with the ridge on the front of the tapestry. This creates the fold line for the hem. The soumak forms a ridge and it does show in the final presentation at the very bottom and very top of the piece. With this in mind, you may want to change colors of the soumak as you go across to match what you will weave next. There are many references for soumak. Kathe Todd-Hooker has many in her books.
6. Start your tapestry.

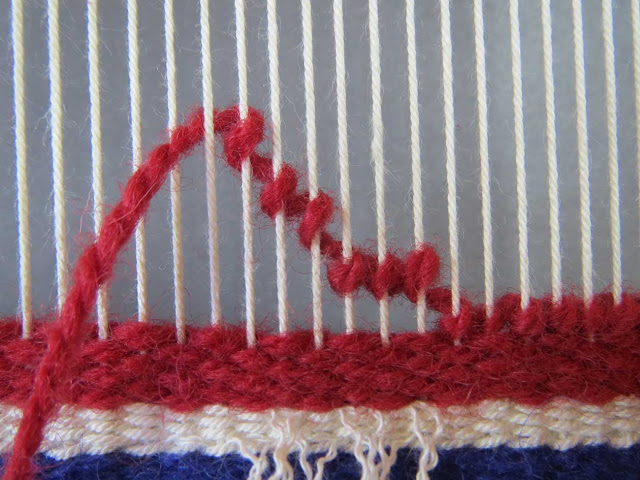
Here is a photograph of that process. The purple yarn at the bottom is waste and will come out. The white is the warp and the 6 picks of weft are in red with the soumak going in at the top. The back of the tapestry is facing me. I weave from the back. If you weave from the front, you'll need to flip the soumak. You want the ridge on the front of the tapestry.
 At the end, do the same thing backwards.

You will need to finish the ends of the weft threads hanging on the back however you do that, vacuum, steam, and then take out the waste and tie a damascus edge or some other kind of knot with the warp ends. I then sew the warp ends down with a sewing machine into the 6 picks of warp used as weft.

Below you can see the damascus knot tied along the edge of the warp. The warps are then sewn into the warp header with a sewing machine and the (black) twill tape sewn through the same band of warp used as weft.
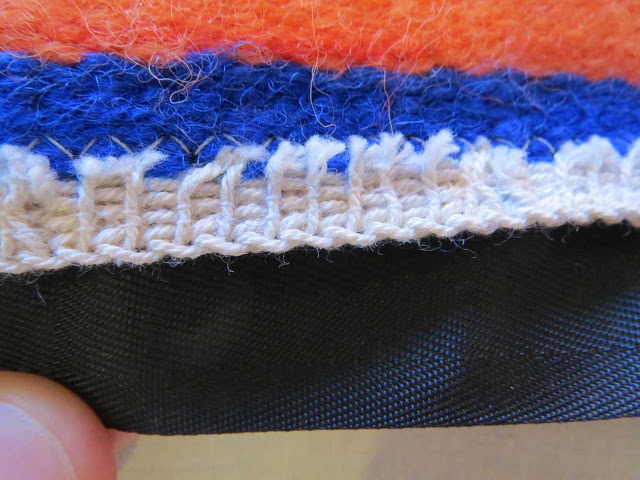
Attach some twill tape for the bottom hem with a sewing machine and then fold along the soumak and stitch by hand.

Below is another tapestry with a wider twill tape folded back and stitched invisibly by hand. (At the top of the tapestry I do it the same way but there is velcro sewn to the twill tape before I do the hand stitching.)
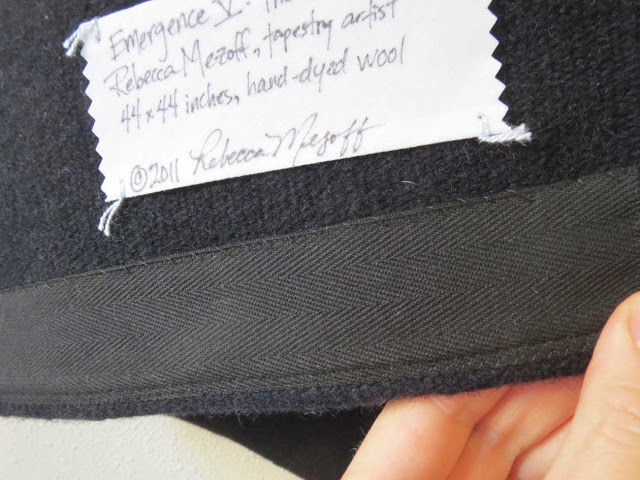
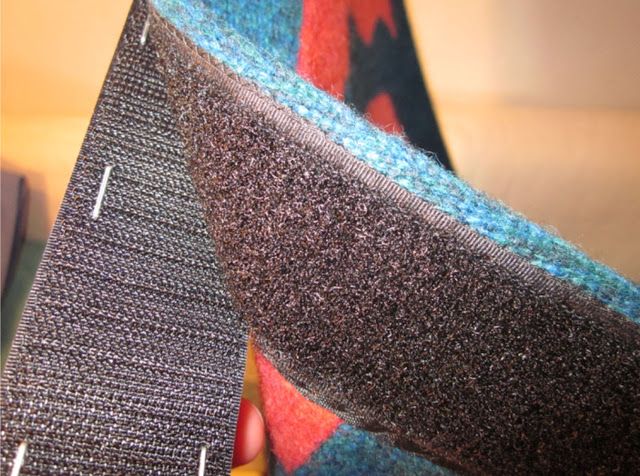
On the top, I also use twill tape as wide as the velcro (1.5 inches, but it will depend on the size of the tapestry and the bar you are using) to back the velcro as I don't know what kind of plastic that stuff is made of. I'm more confident in the longevity of the twill tape against the tapestry. I sew the twill tape to the tapestry and the soft side of the velcro to the twill tape. This will mate with the sticky part of the velcro that is on the hanging bar. Don't put the stiff part of the velcro on the tapestry. It will continually stick to it when stored or shipped especially if it is woven with wool.

Below you can see the ridge of the soumak at the fold and the 3 sequences of weft. The twill tape is sewn right over the warp used as weft section so all you see is the weft yarn.

My tapestries are hung from wooden bars made of one by two inch poplar (or whatever they have at Home Depot that day, just make sure they are straight). The actual size is 3/4 inch by 1 1/2 inches. I'll never understand why wood is sold by the measurements before they plane it. A one by two inch board is definitely not one by two inches. Neither is it one by two centimeters, just for clarification. I sand the wood, paint it black, drill two holes 3 to 6 inches from both ends, and staple the stiff side of the velcro to the wood.
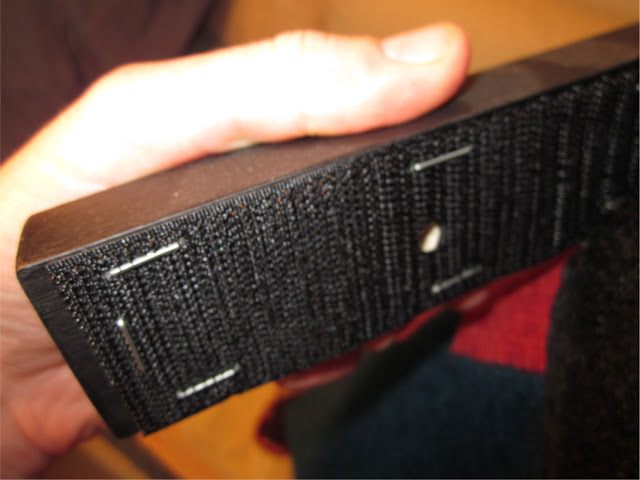
Detail of the soft velcro sewn to the twill tape sewn to the tapestry as well as the bar and the stiff part of the velcro.
That is it! There are many ways to hang a tapestry. This one is my favorite at the moment. I intentionally hang my tapestries about an inch from the wall because I really hope this helps keep the critters from wanting to live back there.

Dress it up and believe

I started thinking about costume this morning as I was idly picking at the holes in my sweatpants. I was wondering what on earth I was going to wear to my physical therapy appointment this afternoon and realizing that my normal costume is blue jeans and an informal shirt which definitely does not lend itself to a workout. I used to only wear old printed t-shirts from places I worked and have visited, but sometime in the last decade realized I wasn't 13 anymore (I am 23 if anyone asks). Now the t-shirts are the same, most of them just don't have printing on them and a few actually have collars.

I am going to physical therapy for an ongoing knee problem in the hopes that I can get back on the long-distance hiking circuit in the next couple years in a serious way. What that really means is that I want to go backpacking again and I don't want my knees to feel like a little troll is stabbing the outsides of them with a very sharp cocktail sword (sans cherry) with each downhill step. That can be very uncomfortable.

Although I am a fiber artist, I know nothing about fashion or couture (I had to look that word up to spell it right if you have doubts, but probably the jeans and old t-shirt example above has already quelled them). I was just wondering about what we put on every day, how it makes us feel, and how it changes how other people see us either because it makes us feel great and so we look great, or because of the costume itself. And then I started wondering if there was any connection between these thoughts about costume and the sort of fiber art that I do.

I think the connection I need to make today is the one about feeling great. If I believe in what I am doing, I believe in the art, and the piece might even be great. Even if it isn't, if it comes from a place that is important to me, it is much more likely to be something I enjoy making and looking at in the (hopefully) short time it stays on my studio wall. And I will be enthusiastic about it when people inquire about my work and they will also believe. I think this is kind of how the world works in general. What is real is debatable, but we believe what has meaning to us or to the person influencing us.

So I'm headed to the studio now to get things ready for the opening on Saturday and the following tapestry design class. I believe it is going to be great. Actually, it already is.


The sound of tapestry bobbins

I ran across this beautiful video today while browsing about the internet. It is worth a watch. It is titled Jilly Edwards: How to weave from an original design and it does show her inspiration and design process. It also shows her weaving on an upright tapestry loom with bobbins. I loved the sound of the bobbins knocking together.

And then she shows you the cutting off. And the tapestry is gorgeous.

Today I am from Santa Fe.

For most of the last decade I have lived in small villages north of Santa Fe, NM. Santa Fe was always the big town that I went to for the wonders of Trader Joes and Vitamin College for gluten free pizza crusts and Nut Thins.  Even when I lived in the South San Juan mountains near Alamosa, CO, Santa Fe was the big town and the three hour drive for a trip to Target and Artisan not to mention a few yarn stores and maybe Collected Works was a trip to the big city. So for ten years I have been dodging around Santa Fe and thinking about it as an artist community and not really a place that I live... until now. Now, I'm from Santa Fe.

Santa Fe is a place that seems grounded in some ways with its attractive, curvy, adobe-lined, narrow streets and 400 year history. And in other ways, it is a town with widely ranging ideas politically and socially and it doesn't seemed grounded in anything. Santa Fe is relatively small especially compared to Albuquerque's sprawling, gridded, valley-bottom messiness. I can drive from one side to the other in 15 minutes. But it is not the little villages I came from. I'm hoping that Santa Fe's small city status will be something that I can deal with being the girl from the mountains who searches for by-ways out of the way of mainstream America and likes to live on the tops of mountains and mesas in spots that are sometimes not strictly accessible by her Volkswagen Golf.

Rural New Mexico is a place where dusty sedans and pickup trucks filled with people and dogs sit on pull outs on the side of the highway every day every few miles waiting for their kids to get off the bus at 3:23 in the afternoon. It is a place where we struggle to educate our kids, our teachers, and our professionals. We have a large drug culture and low rankings in education and health care for children.

NM is a place that is brutally dry and only getting drier. The land around El Rito where I used to live has been chewed through by pine beetles and all of the pinon pine are dead leaving juniper sentinels standing alone surrounded by pockets of rotted and falling over pinon trees.

SF river is a bone of contention among Santafeans. It is dry most of the time. The town is trying to find water to make it run but there isn't any water. I recently took a hike into the Santa Fe National Forest and came just to the edge of the forbidden zone--Santa Fe's watershed. Here is one of the touted three "lakes" that are Santa Fe's emergency water supply. Does this look like enough water to fill hot tubs and water grass for 60,000 plus people? (Fortunately very few people in Santa Fe actually have grass.)

Those mountain and mesa tops will always be places that sustain me and will be places that I return to over and over again. But I need to look toward a more sustainable future and that means living somewhere where I can ride my bike down the rail trail to my studio and to the hospital to work. And it means choosing the house and studio in town instead of the place on the mesa with a view.

Perhaps it remains to be seen whether the drying of the southwest will continue and my favorite part of the country will become one big ghost town because of lack of water. If we as humans continue on the current path with global warming and unsustainable living practices, I don't see how the American Southwest can survive because it will be completely dry. But for today, maybe we can start a revolution. (Forgive me. The drought and the heat and the fires have prodded me upon a little soapbox.)

I know that my peripatetic tendencies have been a little frustrating to people in my life at times. Some people can't fathom moving as frequently as I have. Some people say I just can't figure out where I want to be. I think the truth, in part, is that the particular place is something I need to experience and then somehow life shifts and I need to move on to another experience. So I can't say that I will always be from Santa Fe. But I am here now and I will make the most of it.

A little time in the woods.

Life has gotten too busy lately. And time in the woods, which is very important to me, has fallen by the wayside. In desperation, I begged my family to go car camping over Labor Day weekend... and they weren't too hard to convince.
Four days in the high country of Colorado with a toddler, my hammock, a bag of knitting, and assorted wildlife did me good. I wish I could have stayed another couple weeks though. I wasn't ready to come home.

On the way out the door early Saturday morning, on a day which I knew was going to involve a stop halfway to my sister's house to transfer the contents of the carefully packed Volkswagen to my brother-in-law's old diesel Toyota 4 x 4, picking up lunch in Alamosa which was uncharacteristically packed with people attending a car show, picking up an 18 month old and her parents, and driving another couple hours to find a campsite as far from the ATV-driving Texans as possible (my apologies to all Texans who don't spend their summers tearing up the Colorado mountains on ATVs. I am sure there are some of you out there)... I turned around, grabbed anther skein of yarn from the stash, whacked the swift onto the dining room table, and wound the skein I suddenly was sure I would need in case the project I had planned but hadn't started didn't work out. Emergency yarn. Knitting in the woods is important. I did try to hide this activity from Emily, fearing ridicule. But the large cherry swift is a hard thing to hide. (It turns out if after passing the fields packed full of RVs pulled by massive pickups you keep driving far enough to actually need the four wheel drive you painstakingly transferred all your gear into, the camping opportunities are wide open.)

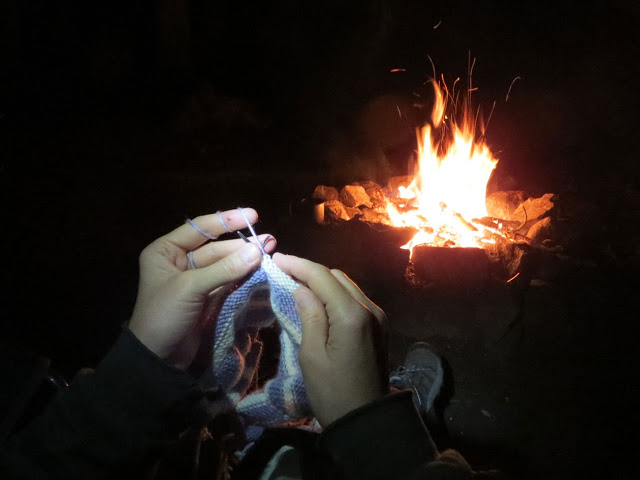
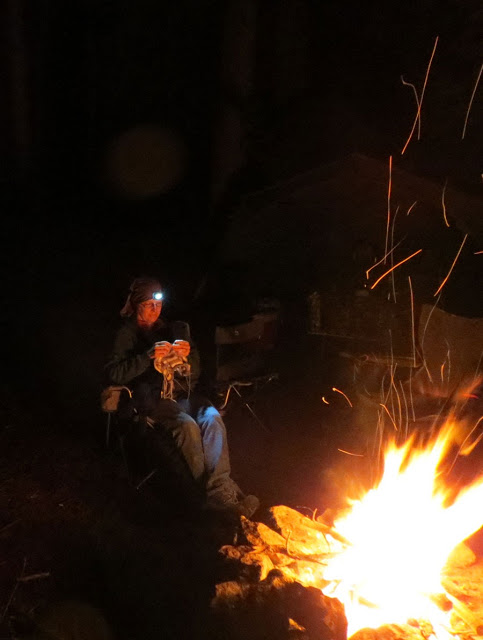
I knitted about half of a baby sweater... some by the light of my headlamp.
The baby was adorable. She learned approximately one million words over the weekend and used them all appropriately the minute the neurons connected. I'm sure she is going to win a Pulitzer Prize for fiction one of these days soon.
She was especially impressed by the bull we encountered soon after setting up camp and walking up the road. She was even more impressed the next morning after hearing the story of how the bull woke me up in the middle of the night standing just outside the tent. He left a huge calling card and as she is learning about the potty right now, she was very intrigued by the large pile of bull poop left 10 feet from my head while I slept. Two days later as I sat in my hammock reading a hiking book (not, you might notice, actually hiking), that same bull sauntered right through camp pretty as you please. Walked right through the middle of all of us without a glance to either side. I think we were camped in his toilet quite frankly.

The signs of fall are undeniable. I love the fall. But I hate the end of the hiking season.

Barn Burned Down

I sold a piece in a show in Colorado recently. I actually am quite fond of this piece. It was inspired by a specific moment when I was in Austria in 2010. I was hiking up a mountain and there was an old barn next to the trail. I peered through the slats in the barn and could see the sunlight coming through the other side and making patterns. One day much later as I was working on some tapestry designs, I started thinking about the barn and about a haiku that I like a great deal.

The poem is by Mizuta Masahide, a 17th-century Japanese poet.
Barn's burnt down --
now
I can see the moon.
For many reasons, this poem has been helpful to me over the years. I think it is mostly a reminder that things change and simplification, even when it seems catastrophic, can lead to better things.

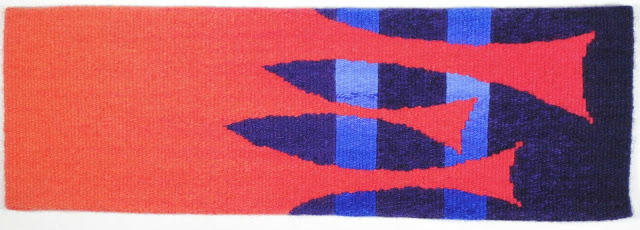
Here is the tapestry. It is called Barn Burned Down (Now I can See the Moon).
Barn Burned Down (Now I Can See The Moon), 5 x 17 inches, hand-dyed wool tapestry
It was bought by a tapestry artist who I respect a great deal. I am happy to think of it being enjoyed by him for years to come.

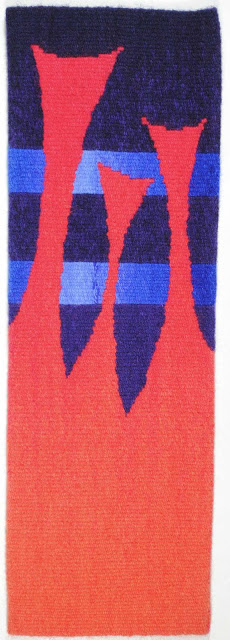
That piece had a companion piece called (Barn Burned Down) Now I can see the Moon. I don't recommend ever naming two piece with the same words in the same order with only parenthesis as a distinction. I submitted both of the pieces to the show and it was hard for me to figure out which one actually got in! And you can see that if you go to my website which has the names reversed. Perhaps it doesn't matter that much as both tapestries were about the burning and I have yet to weave one about the moon. Perhaps that should be up next on my list.
(Barn Burned Down) Now I Can See the Moon, 5 x 17 inches, hand-dyed wool tapestry
The show was a special event in itself. The link to the show information, Woven Together: Firestorm,  is HERE. There are photos of the show near the bottom of the page in a slideshow. The show was a response to the 2012 fire season in Colorado which was catastrophic to say the least. Fire is a reality we live with more and more in the western USA. We have had years of drought and lots of beetle-killed forests. Things burn fast and hot. People die fighting the fires. Hundreds or thousands of homes are lost in many fires every year.

By the way, I accidentally set the second tapestry on end in my studio one day and a student said she liked it that way. I think I do also. What do you think?

Weft yarn recommendations for tapestry

The tapestry technique book that I recommend to all my students is Kathe Todd-Hooker's Tapestry 101. Kathe is a brilliant woman and knows her way around tapestry. The book is packed with information. I was rather amused to hear from one of these students that in this book which I recommend frequently, Kathe specifically does not recommend the weft yarn that I have used in all my tapestries for a decade. On page 28 she talks about yarns NOT to use for weft and the two she lists are Nehalem/Willamette yarns and Harrisville yarns. I have no familiarity with the first yarn, but I have used Harrisville yarns in Shetland, Highland, and a singles yarn they spin for me since I started weaving tapestry in 2005.

After visiting the mill and having some students use the Harrisville yarns that come on cones, I do understand her comment in the book (p 28). She says
Harrisville yarns look great on the ball or cone, but the colours grey out when beaten into the tapestry and when combined in the weft bundle. This is probably because they are spun in the grease and are very tweedy looking.
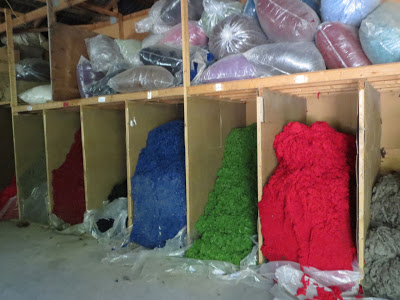
Harrisville yarns are spun from dyed fleece. See my lengthy post on my recent visit to the Harrisville spinning mill HERE for photos and more information. The yarn comes to the mill in 500 pound bales of pre-dyed fleece like this:
They mix the different colors to get their yarn and, as Kathe suggests, they do indeed look very heathered. I like this textured look in tapestry and it is partially why I dye my own yarn as hand-dyed yarns tend to be slightly uneven in color. The Harrisville yarns are not uneven, but the mixing of colors in the carding process does create a yarn that does not look like a solid color.

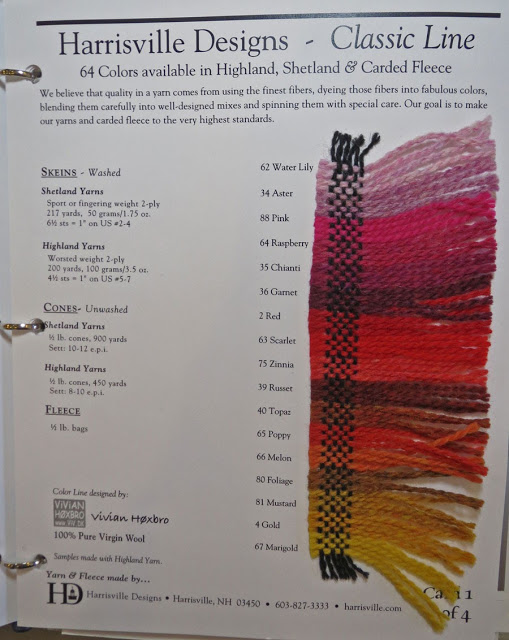
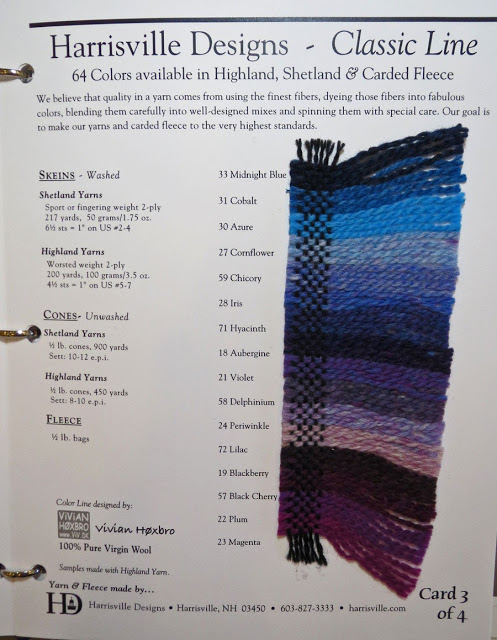
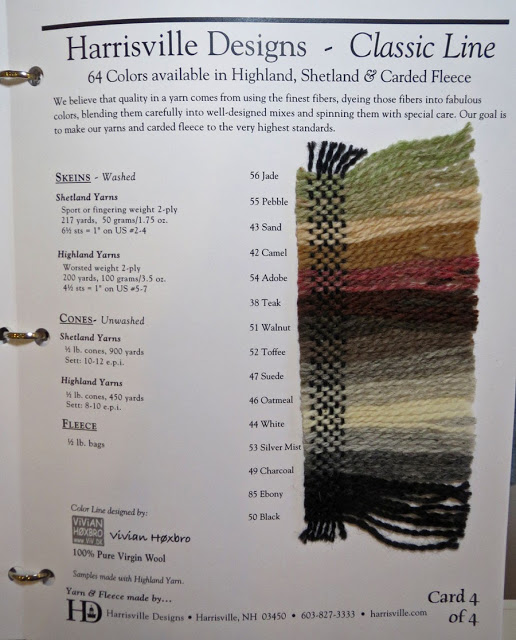
In this instance, you have to remember your color theory and consider what happens with yarn and color which is very different than paint and color. These yarns are made by mixing pre-dyed fleece. The varied effect in the yarn from doing this is very engaging, but it does affect the vibrancy of the color. If you look at the color cards at the end of the post, you can see that the colors are all somewhat muted. When you mix these already-muted colors of yarn with other already-muted colors of yarn, depending on the hues and values involved, you really can create a very subdued palette. Consider what you want to achieve and choose your yarn accordingly.

I buy Harrisville yarns in white and dye them myself. But at my recent workshop, I was able to try out some of their colors. What struck me was the difference in the feel of the yarn. The fleece has been cleaned when it arrives at the mill and in the picking process (see video HERE), some oil is added back into the yarn to help with the spinning. The yarn is never washed again. So what you get on the cones still contains a fair amount of oil. The yarn is much flatter and doesn't really resemble the fluffy, beautiful yarn that I use (which does, after all, come from the same mill). If I was going to use their colors, I would skein the yarn and wash it before I put it in a tapestry. This would restore the loft and it would also mean that your finished tapestry didn't have that oil in it which may be an attractant to bugs. Harrisville Designs actually recommends washing your piece after weaving to restore the yarn's loft. Of course they are assuming you are weaving cloth and not tapestry. You would never wash a tapestry in the washing machine or even bathtub, right?

Another option is to buy the yarn in the 3.5 ounce skeins that are sold as knitting yarn. This yarn has been washed and has much more loft right out of the box. I often buy this skeined yarn in white and dye it myself, but I find that I still need to scour it one more time before dyeing or the dye doesn't take evenly.

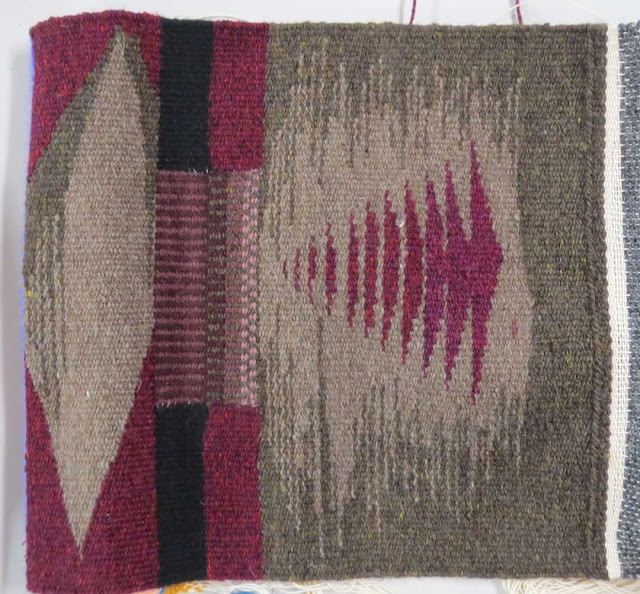
Harrisville yarns come in 64 colors. The color range is not designed for tapestry and doesn't have much in the way of color gradation. But the colors they do have wove up beautifully. No they are not bright jewel-tone colors, but they are lovely. For example, this student sample was woven completely with Harrisville yarns straight from the cone.
Here are photographs of the Harrisville color card. You can order a card from them. They weave all the yarn samples by hand so they do charge for these cards. But they are beautiful and durable and worth the cost if you are going to be weaving with their yarn.


Happy weaving!