In my blog post of February 5, 2026, I talked about how to warp a peg loom unevenly for various setts. In this post I’ll discuss how to space warps on other kinds of looms. In this post I’ll mostly be looking at tensioned frame looms warped a couple different ways. You might recognize this sort of loom as being a rectangle with some way to increase the tension on the warp. Examples are:
Mirrix’s classic looms like the Big Sister
Schacht Arras
Glimakra Freja (this loom is a little different as it has pegs on the top and bottom)
Hagen loom
many varieties of pipe looms
Spacing the warp on these looms can be done in a variety of ways. There are some loom specific tips here but other ideas can be used on a wide variety of looms.
Loom specific tips
Mirrix classic loom with the bottom spring kit and ordering cord installed
On a classic Mirrix loom, the bottom spring kit is a huge benefit in spacing your warp evenly as you warp. The spring gives you a way to evenly space the warp at the bottom of the loom without using a ruler and manually spacing. It is important to note that the springs for these looms come with different setts and your top and bottom one should match. They can also get bent, so examine your spring when you put it on the loom to make sure the spacing of the dents is even.
If you don’t have the bottom spring kit and don’t want to get one, you can use the tape method described below (under pipe looms) on a Mirrix as well. Many of my Mirrix looms have blue tape across the bottom with inches marked on it!
Another trick I use on my classic Mirrix looms is an ordering cord. In the photo you can see some white warp tied between the two upright pieces of threaded rod. This cord goes across four times and is tied very tightly. Each time across is in a different shed so it holds the warp in place and allows you to space them as well. If you don’t have a bottom spring kit for this loom, I highly recommend using an ordering cord. I use both.
Schacht Arras with ordering cord at the bottom.
The Schacht Arras loom doesn’t come with a bottom spring kit either, but you can order one and install it in the pre-drilled holes. I recently got one of these kits but can’t put it on my Arras until the current tapestry is finished. If you don’t have this bottom spring to help you space the warps, you can use an ordering cord on this loom. You have to tie it all the way around the upright supports and can’t tilt the loom while you’re using it, but once you have woven a little bit you can cut it off.
The last time I warped this loom I added a piece of tape with inches marked on it. You can get commercial ruler tapes or just use a piece of painters tape that you mark with inch and half-inch marks.
Schacht Arras loom with inch-marked tape on the bottom beam. This tapestry has a double sett so there are two warp threads where you’d normally see one, but the sett is 8 epi.
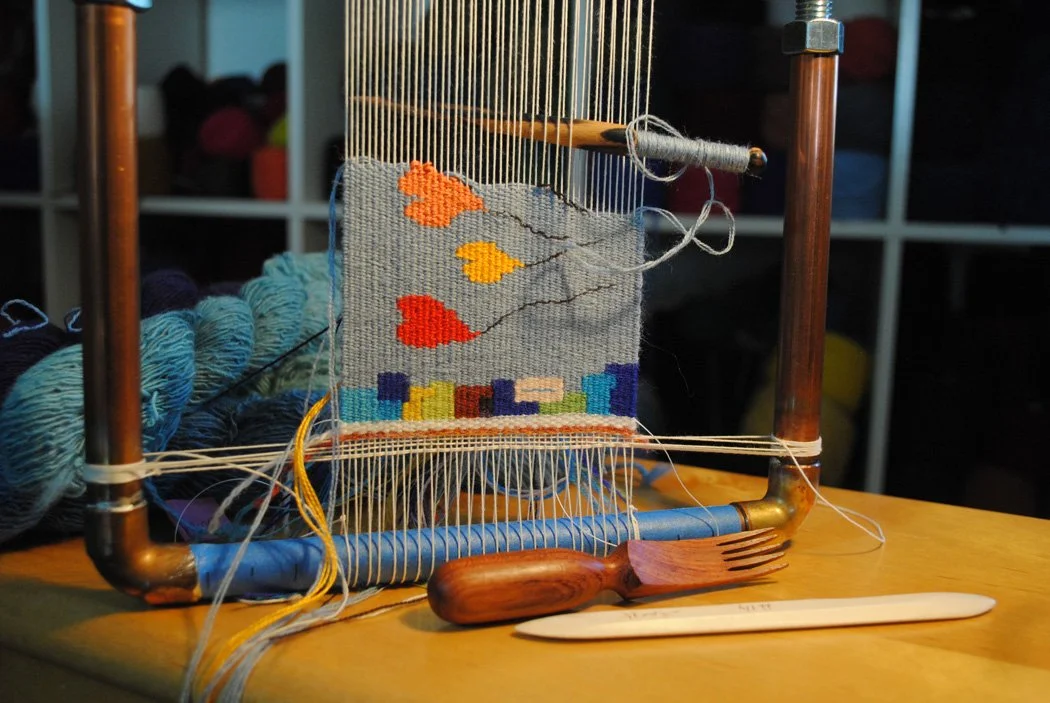
Copper pipe loom with blue tape marked with inches top and bottom. Notice I also use an ordering cord on these looms.
On a pipe loom, you just need a simple piece of tape marked with inches and half-inches (or whatever unit of measurement you’re using). I often use copper pipe looms that I make myself and I’ve included a photo here, but if you’re using black pipe or even PVC, the same procedure applies. On these looms I use the tape on the top and the bottom as I don’t have any other spacing method around the pipe like you would have with springs or a peg loom.
Sarah Swett uses galvanized or black pipe for her looms and she likes to use gaffers tape for this purpose. It is grippier than blue painters tape and works well on the slippery metal.
When using a pipe loom, you’ll apply the warp in whatever method you’re using (figure-8 or continuous) and get the warps in the general place they need to be. In the photo at the right I’ve used a figure-8 warp and have some sticks to get the shed just right at the top. I put these in and then snug up the tension. I add the ordering cord and then I spend a lot of time getting the warps evenly spaced. Keeping the warp tension tight will help them stay where you put them. Once you put in your header and start weaving, things should stay in place nicely as long as you keep the warp tension tight.
The sett on this piece is about 14 epi. Remember that when you see the next inch mark, that warp belongs to the next inch.
General tips for most tensioned frame looms
Start your tapestry with the warps evenly spaced however you do that.
Use some method to make sure your warps are spaced at the sett you want. Remember that different warping methods can affect how many warps you have in an inch! Put a ruler against that warp and count if you suspect you might have gotten the math wrong!
Consider using a spacing technique like twining or evenly spaced double half-hitch knots either before you start your tapestry or as part of the header.
Weaving waste yarn can be a great way to get the warps evenly spaced and ensure you have a nice solid surface to start your tapestry on. If you’re not using a header with knots in it, this also ensures your tapestry won’t fall apart when you take it off the loom before you finish it.
Why is it important to make sure your warp spacing is even before you start weaving?
Your weaving life will be so much less frustrating if you spend the time to make sure your warps are evenly spaced before you begin. This takes time and patience, but it is worth it.
When your warp spacing is wider, the weft will sink down more in that area causing a dip in your weaving. When the warps are closer together, there isn’t anywhere for the weft to go and you start to see the warp showing (lice) and sometimes when extreme, the weft will start rising up in a hump. Both of these problems need addressing when they happen in the weaving, but you can avoid them to start with at least by making sure your warp spacing starts out even.
Weft tension or how much weft you put into any one area of the tapestry is how we manage warp spacing as we weave and I talk about that extensively in my classes and book. But it is important to do yourself a favor and start the tapestry on the right foot.
Match your dreams with the perfect Loom
Choosing a tapestry loom can feel difficult. It is hard to know what is out there and then to settle on one you can afford but that will also do what you want it to do… if you even know what you want it to do!
We’ll discuss why particular looms are best for some projects and not great for others as well as other concerns such as where in the world they’re available, what yarns you can use on them, and price.